Below you can find a number of examples for how to use the XTracks sections.
Even more examples you can find if you download my reference route. It can be
found at www.train-sim.com
in the file library with the name 'xroute.zip'. Note that the route is not kept
up to date with the latest version of XTracks and thus does not make
use of all the latest additions.
There is also a reference route for DualTracks made
by William Adams which you can find at
www.train-sim.com. The file name for this route is 'dtref10.zip'.
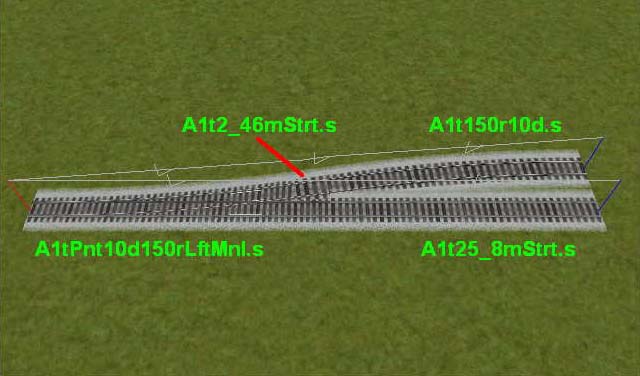
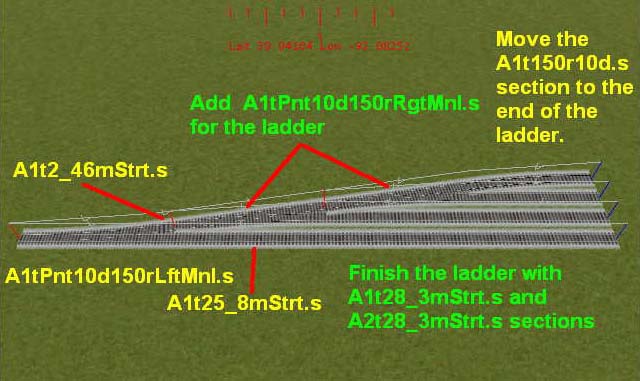
- Steven Master's compound ladders
- Norbert Rieger's slips & switches
- Inserting a Track Node
- Curved 1500r & 2000r switches
- Short 5d switches
- 3-Way switches
- 10d modular switches
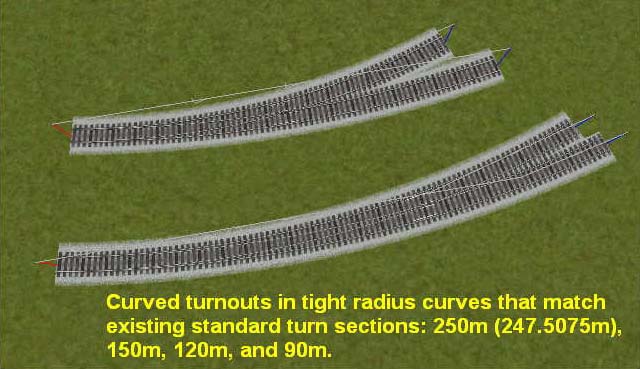
- Tight curved switches
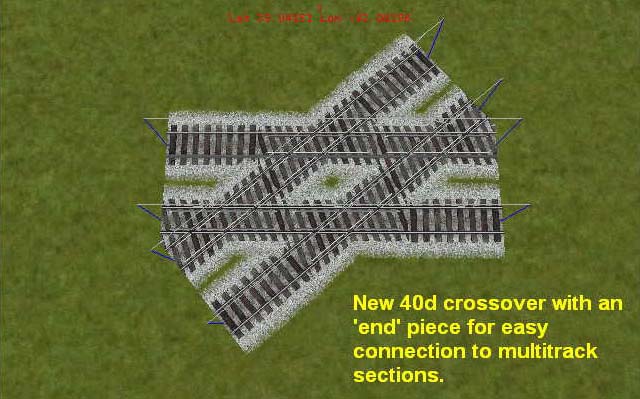
- 40/75 degree xovers
- Modular switches
- Curved switches
- Crossings
- Turntable & Roundhouse
- Tunnel switches
- Single & double slips
- Animated bridges
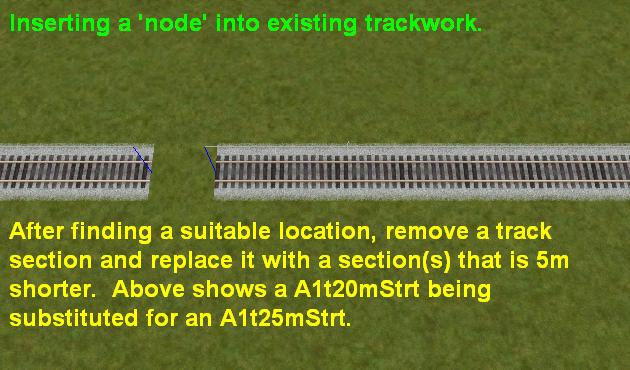
Inserting a Track Node
(by Steven Masters) This trick is used to insert a track node in long stretches
of single line track.
The train position is calculated from the last track node passed. A track node
is a switch or crossing and shows like black dots in the Activity Editor. Due
to rounding when calculating the trains position there is an error when
reaching the next track node which can cause the train to jump. This can be a
real problem on routes with long stretches of single line tracks, especially if
it contains many curves.
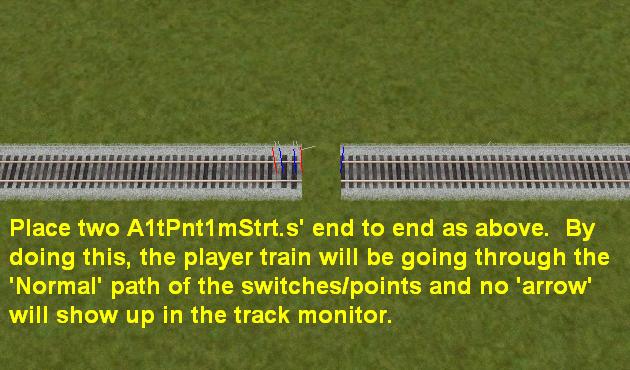
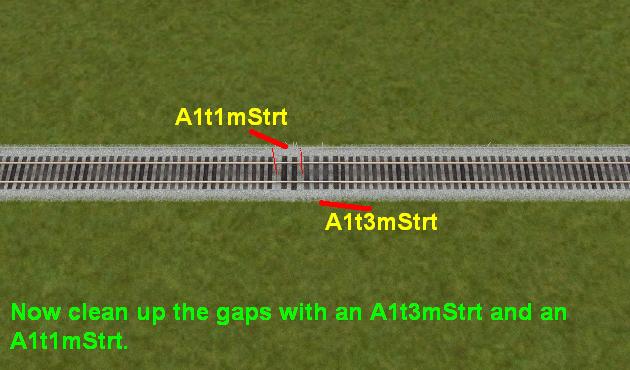
To minimize the problem this very short siding track can be inserted to divide
the long stretch of track into shorter stretches. Thanks to using two switches
there is no risk of derailing as both paths converge again after two meters
even if you happen to use the 'G'-key.
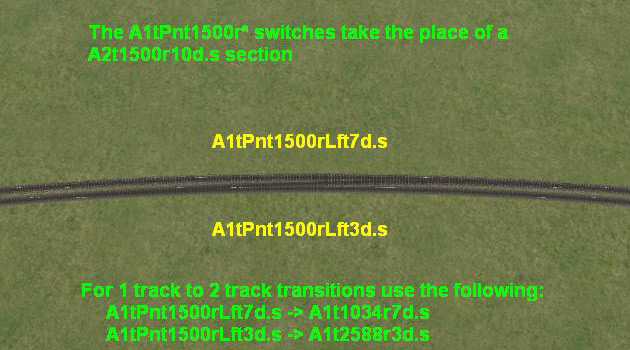
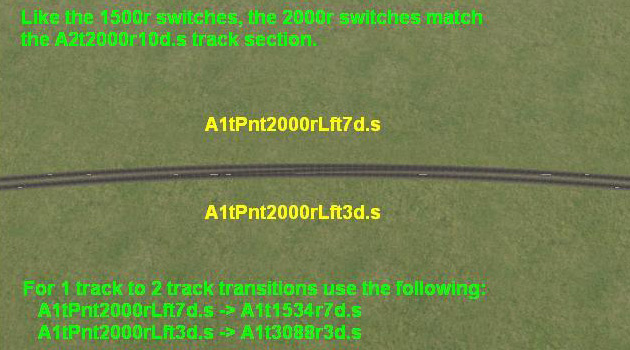
Curved 1500r & 2000r switches
(by Steven Masters) Steven used my calculations to produce 1500r and 2000r
curved switches
along the same designs I used for 500r and 1000r. Thanks to the wider radius
the switches can
be fitted in a 10d arch instead of the smaller radius switches which use a 20d
arch.
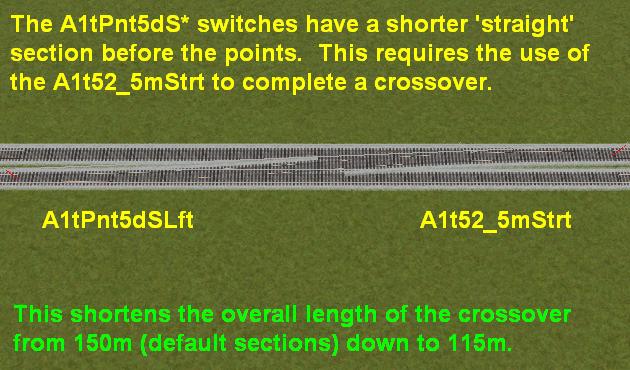
Short 5d switches
(by Steven Masters)
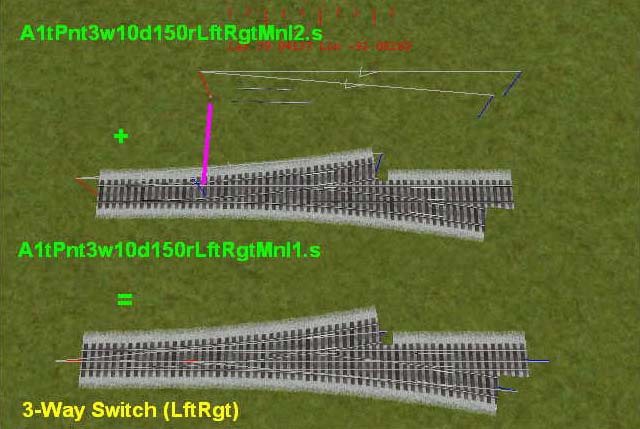
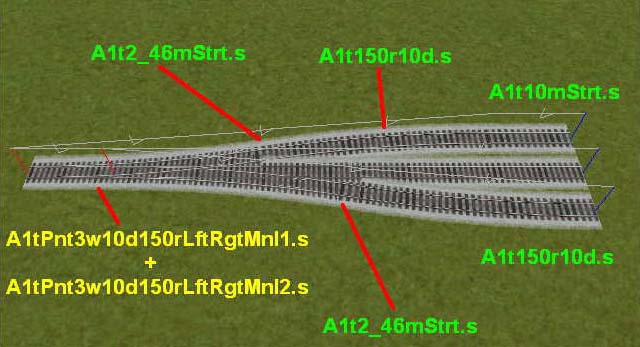
3-Way switches
Switch (by Steven Masters):
Ladder (by Steven Masters):
10d modular switches
Switch (by Steven Masters):
Ladder (by Steven Masters):
Tight curved switches
(by Steven Masters)
40/75 degree Xovers
(by Steven Masters)
Modular 3 & 6 degree switches
Please note that the one-piece modular switches (a1tPnt3dB* & a1tPnt6dB*)
can be used in most cases in the following examples to reduce object count.
Only in the slips is the older design necessary.
These are designed to allow a large number of different layouts. To understand the basic geometry I will walk you through some basic combinations starting with a simple crossover. These pieces are also available in narrow gauge versions (3 degree only). The concept of both 3 & 6 degrees are the same thus I only show how to lay the 3 degree switches. Difference is the 6 degree switches uses the 5.5 meter straight when building a crossover and the 11.3 & 22.6 crossings for slips and diamonds.
Start with a a1tPnt3dLftMnl (straight path equals a1t10mStrt and curved path
a1tEndPnt3d). 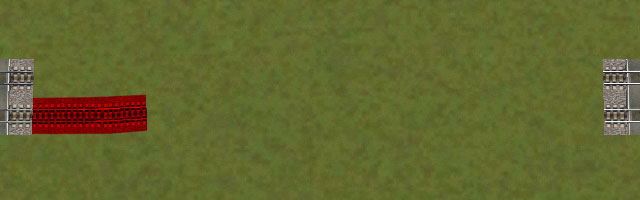
Add an a1tEndPnt3d (note that the same endpoint is used for both left and
right). 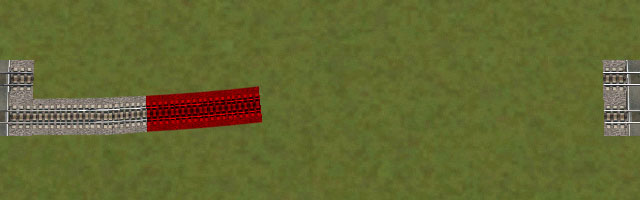
Next an a1t2_6mStrt. 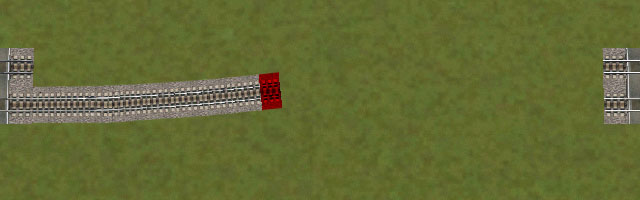
An a1t10mStrt. 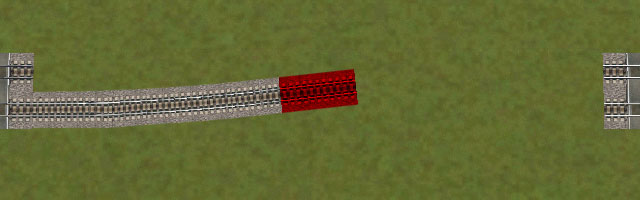
Another a1t2_6mStrt (or use an a1t15_2mStrt for the three). 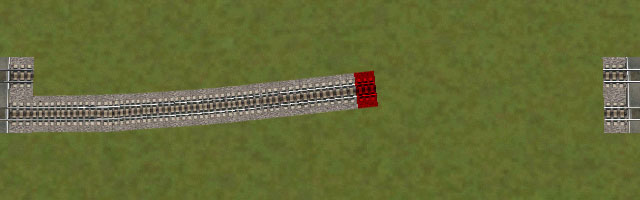
Start turning back with an a1tEndPnt3d. 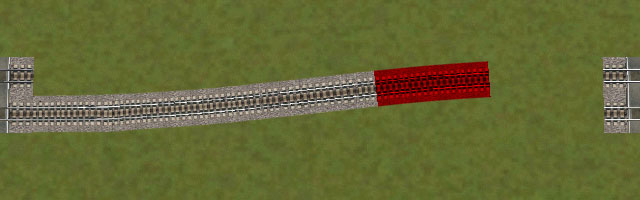
Finally an a1tPnt3dLftMnl (use an a1tEndPnt3d to build a switch). 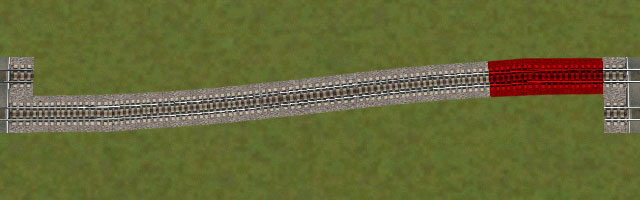
Finish it off with some straights, 1 a1t50mStrt and a 1 a1t15mStrt for each
track.
Total lenght of the completed crossover is 75 meters. 
Substituting the a1t10mStrt with an a1tXover12d is the first step in a diamond
crossover.
(or use an a1tXover12dB and you don't need the short 2.6M straights) 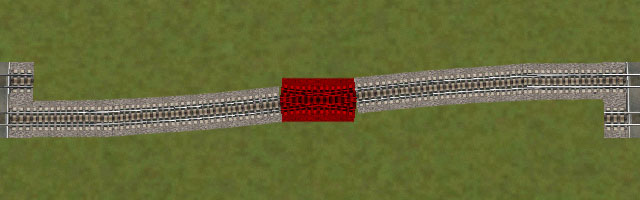
Build the other crossover using right hand switches. 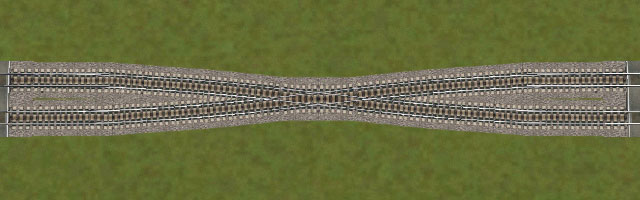
Finish it off with 1 a1t50mStrt and 1 a1t5mStrt for each track 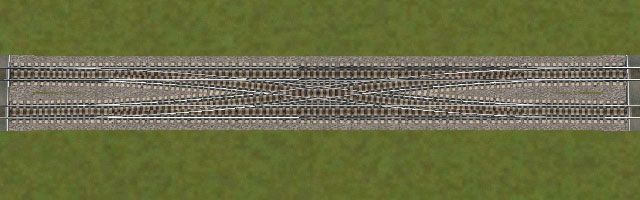
Part of the modular switches is also a1tXover6d to build slips and crossings.
This double slip is built with that and four switches, use two a1t10mStrt to
create a single slip. Both legs totals 30 meters and this slip could be
incorporated in the above configurations. 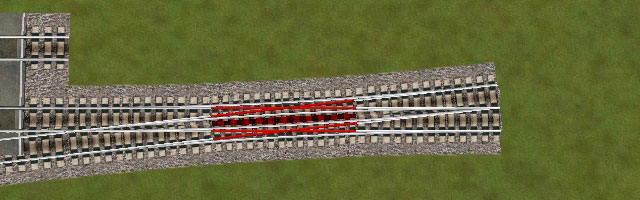
There's also an a1tYPnt3dMnl that fits into the system and with these pieces
it's possible to make many different layouts. In this picture the upper right
track goes to the three middle left tracks and the lower right to the two outer
left tracks. All track intersections are true crossings, parallell tracks are
correctly spaced and matched to attach with a2t-pieces without a single dynamic
track needed.
It would be easy to add more crossings and switches to form an even more
complicated layout with slips, ladders and crossovers. 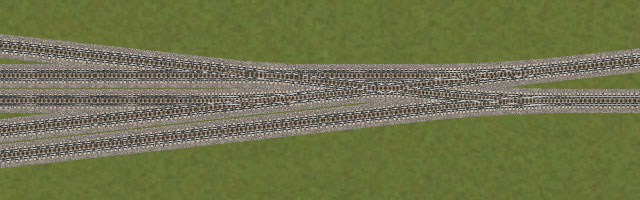
Curved switches
The curved switches can be used both for crossovers and for transitions from
single to dual track.
A crossover is built with a pair of left hand or right hand switches, the 12
degree switch goes on the outer track and the 8 degree switch on the inner
track. Complement with a couple of standard 10 degree single track curves, no
need for dynamic tracks. The completed crossover occupies the same space as a
dual track 20 degree curve of the same radius. Note that the example show the
500 meter radius switches. The 1000 meter radius switches look slightly
different but work the same.
This example uses 1xa1tPnt500r12dRgtMnl, 1xa1tPnt500r8dRgtMnl &
2xa1t500r10d. 
If you want to build a transition from single to dual track you replace one of
the switches with a curve:
a1tPnt500r12d* -> a1t365r12d
a1tPnt500r8d* -> a1t700r8d
a1tPnt1000r12d* -> a1t865r12d
a1tPnt1000r8d* -> a1t1200r8d
The other leg is completed with a standard 10 degree curve as above.
Crossings
These crossings are built for correct distance of parallell tracks and without
need for any dynamic tracks. You can repeat them for as many parallell tracks
as you need, included are 90, 79, 62, 45 and 26 degree crossings. The 79 degree
is complemented by an a1t1mStrt track section for even parallell tracks, 62
degree by an a1t2_6mStrt, 45 degree by an a1t5mStrt and the 26 degree by an
a1t10mStrt. 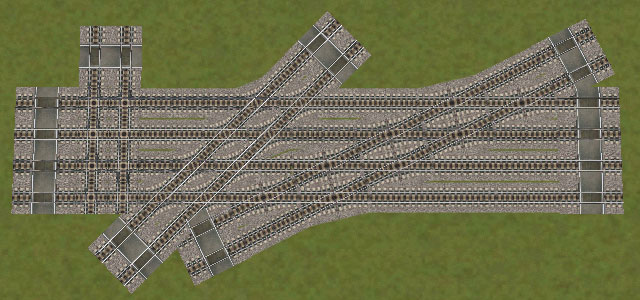
Turntable & roundhouse
Before you ask, the turntable does not and will not work! Many have tried to
make it work and all have failed. I believe an update of MSTS is necessary
before a working turntable is possible. Roundhouse is designed to to be used
either with the turntable or the 5 degree Y-switch. 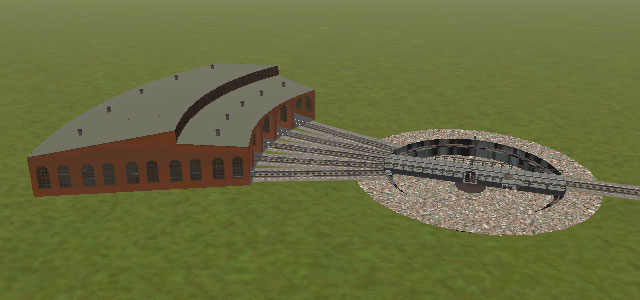
Tunnel switches
I've included a number of 10 degree tunnel switches.
A1tPnt10dLftMnlTun/a1tPnt10dRgtMnlTun can be used to form sidings and split the
line to two track. A2tPnt10dLftMnlTun/a2tPnt10dRgtMnl are used for tunnel
crossovers. A1tYPnt10dMnlTun can be used to split the line into separate
tunnels but also enables a few interesting possibillities. One possibillity is
to make a wye (or triangle spur) using three switches and four same kind
endpoints for each side. 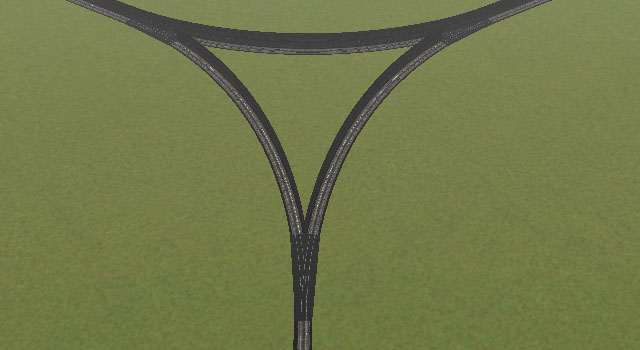
The other possibillity is to make a return loop inside a tunnel. 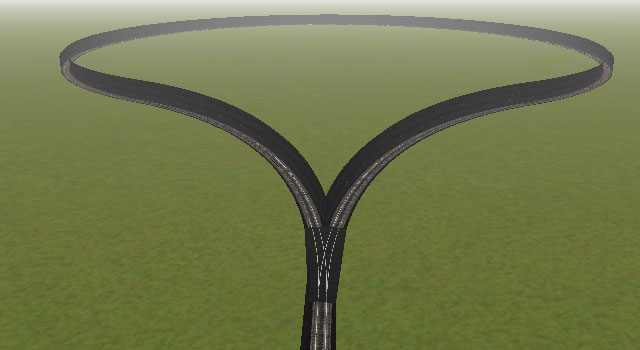 This loop is made of the following pieces going clockwise from the
a1tYPnt10dMnlTun:
This loop is made of the following pieces going clockwise from the
a1tYPnt10dMnlTun:
5 x a1tEndPnt10dLftTun
6 x a1tEndPnt10dRgtTun
3 x a1tEndPnt10dLftTun (turned)
6 x a1tEndPnt10dRgtTun (now you're halfway around)
6 x a1tEndPnt10dLftTun
3 x a1tEndPnt10dRgtTun
6 x a1tEndPnt10dLftTun
5 x a1tEndPnt10dRgtTun
Both these layouts are of course possible with non-tunnel pieces also and in
narrow gauge
(though not with tunnels).
Single & double slips
The slips from version 1 work with special endpieces that needs to be inserted
in the correct location. Instead of these I would recommend the use of the
modular 3 degree switches, they are easier to use and work better. Single slip
looks like this. 
And double slip like this. 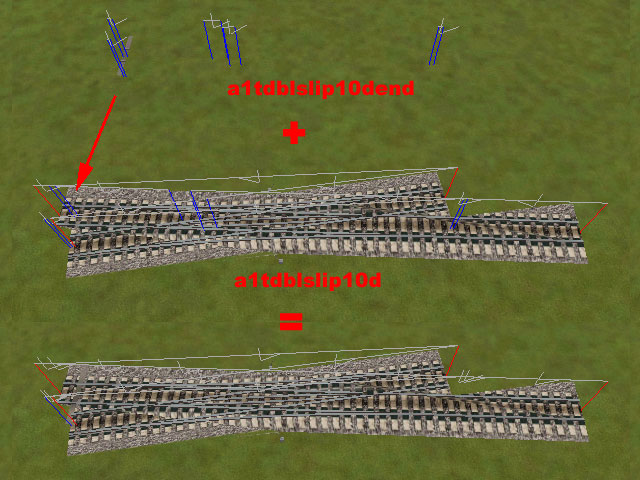
Animated bridges
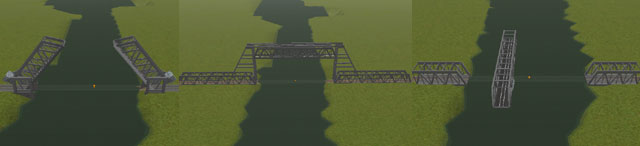 Spring 2002 Rick Lamp made three
bridges with animation. The bridges are a bascule bridge, a lift bridge and a
swing bridge. They work as level crossings and are added to the route .ref
file.
Spring 2002 Rick Lamp made three
bridges with animation. The bridges are a bascule bridge, a lift bridge and a
swing bridge. They work as level crossings and are added to the route .ref
file.
In order to use them you cross a road over the track and lower it out of
visibility. Then you can place the bridge at the intersection and align it with
the track. For this to look good there should be no visible track where the
bridges moving part is. To help with this I have added a 20M invisible straight
that can be used; 'I1t20mStrt'. Each bridge intersection needs three of these
straights as Rick made them 60M long. I made the straight 20M that it could be
used in other circumstances also.
The bridges can be found at train-sim.com, search in the file library for files
'bascule1.zip', 'liftbrg1.zip' and 'swingbg1.zip' and you will find them.
Rick mentions to add them to the .ref file but he does not list the entries.
Here are proper entries for all three bridges tried and tested:
							LevelCr (

							  Class ( "Bridges, Animated" )

							  FileName ( Bascule1.s )

							  Description ( "Bascule Bridge" )

							)

							LevelCr (

							  Class ( "Bridges, Animated" )

							  FileName ( LiftBridge1.s )

							  Description ( "Lift Bridge" )

							)

							LevelCr (

							  Class ( "Bridges, Animated" )

							  FileName ( SwingBridge1.s )

							  Description ( "Swing Bridge" )

							)